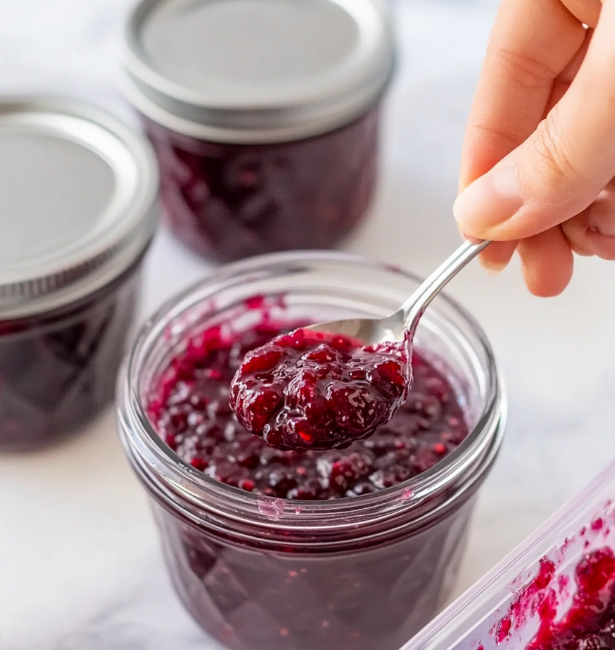
Making homemade jam doesn’t have to be a long, complicated process. This “Three-Minute Jam” recipe combines simplicity, speed, and flavor for a perfect balance of sweetness and fruity goodness. With just a few ingredients and the magic of jelfix, you’ll have a luscious, thick jam that’s low in sugar but high in taste.
Ready to try it? Let’s dive into the details!
Why You’ll Love This Recipe ❤️
- Quick & Easy: Ready in just 3 minutes of boiling time.
- Healthy Twist: Lower in sugar compared to traditional recipes.
- Customizable: Use your favorite berries or experiment with other fruits.
- No Flavor Loss: Retains the vibrant taste and color of fresh fruits.
What You’ll Need 🍒
Main Ingredients:
- 3 kg (6.6 lbs) berries (raspberries, blackberries, or currants)
- 1.5 kg (3.3 lbs) sugar
- 3 packets of jelfix (with 2 tbsp sugar per packet)
Step 1: Choose Your Berries 🍓
Pick fresh or frozen berries:
- Fresh berries: Wash thoroughly and chop for a smoother texture.
- Frozen currants: Gently heat until thawed and soften them before use.
For smoother jam, puree the fruits with an immersion blender. Prefer texture? Leave the berries whole or lightly chop them.
Step 2: Prepare the Jelfix 🌟
Mix 3 packets of jelfix with 6 tablespoons of sugar. This pre-blend ensures an even gelling effect when added to the berries.
Step 3: Combine & Cook 🍲
1. Start with the Berries:
- Place all your berries in a large saucepan. No need to pre-cook fresh berries.
- Add the sugar-jelfix mixture and sprinkle in the remaining sugar.
2. Bring to a Boil:
- Heat the mixture, stirring occasionally, until it reaches a boil.
- Chop larger pieces of fruit while stirring to ensure even consistency.
3. Add Sugar Gradually:
- Gradually mix in the remaining sugar. This ensures it dissolves completely and blends well with the fruits.
4. Boil for Exactly 3 Minutes:
- Maintain a rolling boil and stir frequently.
- After 3 minutes, your jam is perfectly thickened and ready to can!
Step 4: Canning the Jam 🍯
Sterilize Your Jars:
- Wash jars in soapy water, rinse, and place in an oven at 100°C (212°F) for 10 minutes to sterilize.
Fill & Seal:
- Pour hot jam into the sterilized jars, leaving about ½ inch of headspace.
- Secure the lids tightly while the jam is still hot to create a proper seal.
Cool:
- Let the jars cool on the counter. Listen for the satisfying “pop” of sealing lids!
Tips for Jam Success 💡
- Check Consistency: Spoon a small amount onto a cold plate and let it sit. If it holds its shape when you run a finger through, it’s ready.
- Prevent Burning: Use a heavy-bottomed saucepan to avoid scorching.
- Storage: Keep sealed jars in a cool, dark place for up to a year.
How to Enjoy Your Homemade Jam 🍞
- Classic: Spread on toast, croissants, or biscuits.
- Desserts: Swirl into yogurt, layer in cakes, or fill pastries.
- Breakfast: Use as a topping for pancakes or waffles.
- Gift Idea: Package in cute jars for thoughtful holiday presents.
Conclusion 🎉
With “Three-Minute Jam,” homemade preserves are no longer a daunting task. This easy, low-sugar method ensures you’ll have jars of vibrant, flavorful jam ready to enjoy or share. Using jelfix makes the process fast and hassle-free, so you can savor the true essence of your favorite fruits.
Try this recipe and delight in the satisfaction of creating your own delicious jam—without hours in the kitchen. Your breakfast (and desserts) will thank you!
Want more jam ideas or tips? Let me know! 😊


