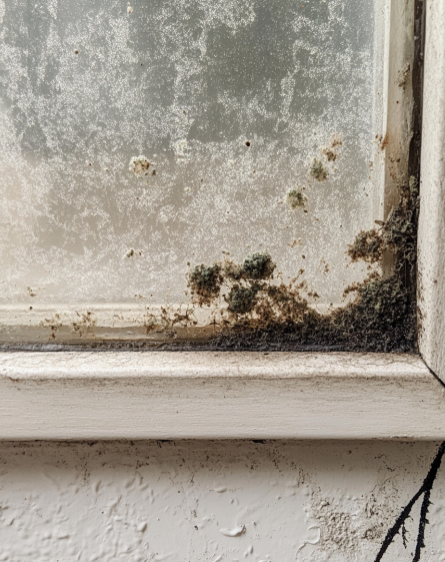
Mold is more than just an unsightly stain in your home—it’s a persistent problem that can cause health issues, especially for those with allergies or respiratory conditions. Mold thrives in damp and humid environments, and it’s most commonly found in areas like bathrooms, basements, or near windows where moisture lingers. Once mold takes hold, it can be tough to remove and often requires more than just a temporary fix.
For years, I tried everything from store-bought sprays to DIY solutions, yet nothing offered long-term results. That’s when my Nana shared her time-tested method, a simple yet highly effective trick that had been passed down through generations. Not only does it get rid of mold quickly and easily, but it also requires minimal effort. The best part? You don’t need to spend money on expensive, toxic cleaners—just a common household item will do the job. Intrigued? Let’s dive into Nana’s mold-removal secret!
The Magic Ingredient: Hydrogen Peroxide 🧴✨
The key to this mold-busting trick is something you probably already have at home: hydrogen peroxide. Found in almost every household’s first aid kit, hydrogen peroxide is not just for cleaning cuts—it’s a natural disinfectant that has powerful antibacterial and antifungal properties. Unlike harsh chemicals, it’s non-toxic, making it safe to use around your family and pets while effectively killing mold. Plus, it’s affordable and readily available in most pharmacies.
What You’ll Need 🛠️
- 3% Hydrogen Peroxide (commonly found in stores)
- A Spray Bottle 🌬️
- A Small Brush or Old Toothbrush 🧽
- Gloves (optional, especially for sensitive skin) 🧤
- Clean Cloth or Paper Towels 🧻
Step-by-Step Guide to Nana’s Mold Removal Hack 🏠
1. Preparation: Setting the Stage 🌬️
Before you begin, make sure the area you’re treating is well-ventilated. Open windows or turn on fans to improve air circulation. Mold spores can spread easily, so ventilation is key.
Next, pour the 3% hydrogen peroxide into a spray bottle—there’s no need to dilute it. The 3% solution is the perfect concentration to kill mold while being gentle enough for use around the house.
2. Application: Spray Away! 💦
Generously spray the hydrogen peroxide directly onto the moldy surface. You want to completely cover the affected area to ensure thorough treatment. Don’t worry about overdoing it—the more peroxide, the better in this case!
Let the hydrogen peroxide sit for about 10 minutes. During this time, it penetrates the mold, breaking it down and starting the process of lifting it off the surface.
3. Scrubbing: Let Hydrogen Peroxide Do the Hard Work 🧽
After the 10 minutes are up, take your small brush or old toothbrush and gently scrub the moldy area. In most cases, you’ll find that the mold has already started to loosen up, so there’s no need for intense scrubbing. Just a few light strokes should be enough to remove most of the mold.
For stubborn spots, you might need to apply a little more pressure, but generally, the hydrogen peroxide does most of the hard work for you.
4. Wiping Clean: Say Goodbye to Mold! 🧹
Once you’ve scrubbed away the mold, use a clean cloth or paper towels to wipe down the area. This removes any mold residue and excess hydrogen peroxide, leaving your surfaces clean and fresh.
If you feel like there’s still a bit of mold left, spray a little more hydrogen peroxide on the surface and wipe it down again. Repeat until the area is completely clean.
5. Drying: Mold’s Worst Enemy 🌞
Now that the mold is gone, it’s essential to keep the area dry. Mold thrives in damp environments, so drying out the surface will help prevent it from coming back. Use a fan or dehumidifier to speed up the drying process, or simply let the area air dry if there’s good ventilation.
Why Nana’s Method Works So Well 🧪🔬
Hydrogen peroxide is so effective against mold because it releases oxygen when it comes into contact with the mold. This bubbling action helps to lift and break down the mold, making it easy to remove. Unlike bleach, which only kills surface mold, hydrogen peroxide penetrates deep into porous surfaces, ensuring that the mold is thoroughly eliminated. Plus, it doesn’t leave harmful residues behind!
Additional Tips for Long-Term Mold Prevention 🌿
Now that you’ve tackled the mold, here’s how to keep it from coming back!
1. Prevent Future Mold Growth 🚫
To prevent mold from reappearing, try to keep the treated area as dry as possible. If you’re dealing with a humid space like a bathroom or basement, consider using a dehumidifier to reduce moisture in the air. Fix any leaks promptly and ensure proper ventilation in rooms prone to dampness.
2. Regular Maintenance 🛠️
Make it a habit to regularly inspect areas in your home that are prone to mold, such as the shower, around windows, and in the basement. At the first sign of mold, treat it with hydrogen peroxide to prevent a larger infestation. Early detection and treatment make mold much easier to manage!
3. Safe Use of Hydrogen Peroxide ✅
While hydrogen peroxide is safe for most surfaces, it can cause skin irritation for some people. If you have sensitive skin, consider wearing gloves when applying it. Also, avoid using hydrogen peroxide on delicate fabrics or materials, as it can cause bleaching.
Conclusion: Mold-Free for Good! 🌟
With Nana’s simple trick, you can finally say goodbye to mold without using harsh chemicals or spending a fortune on store-bought cleaners. Hydrogen peroxide is a safe, effective, and affordable solution for removing mold and keeping your home clean and healthy.
Ready to tackle mold in your home? Grab a bottle of hydrogen peroxide, and let Nana’s method work its magic. Your home will be mold-free in no time—and you’ll wonder why you didn’t try this sooner! Happy cleaning! 🧽✨


