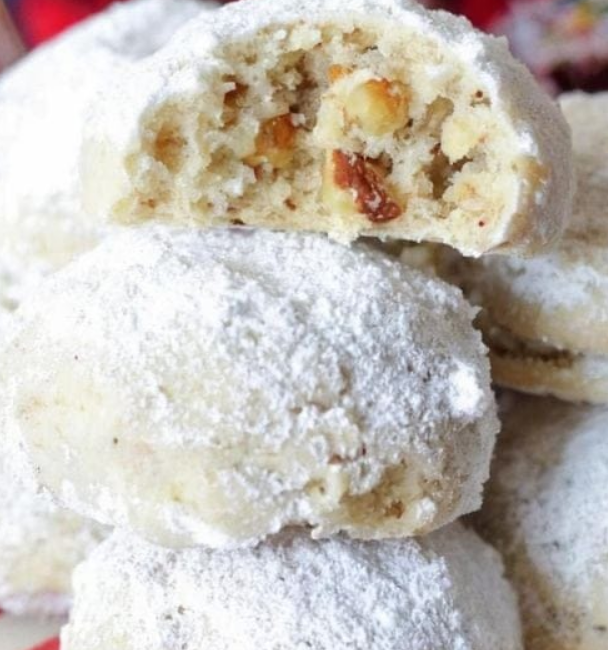
Christmas wouldn’t be the same for me without my mother’s beloved recipe for Russian Tea Balls. These delightful, bite-sized cookies have been a staple in our family for as long as I can remember, bringing back warm memories filled with joy, laughter, and the irresistible aroma of freshly baked treats filling the house. Coated in a generous dusting of powdered sugar, these little delights embody the true spirit of the season, making it complete whenever I prepare them.
The Heart of Tradition
Family recipes are more than just a list of ingredients; they carry the essence of shared experiences, cherished holidays, and love passed through generations. Preparing Russian Tea Balls has become a cherished ritual in my household, connecting me to my family’s rich heritage. Each Christmas, as I gather the ingredients, I can almost hear my mother’s voice guiding me through the steps, reminding me to be gentle when mixing and to savor the moment in the kitchen.
Cooking and baking go beyond mere nourishment; they create connections—to the past, to family members who are no longer with us, and to the generational bonds strengthened by the act of sharing food. Making these cookies is my way of keeping those memories alive and passing them to a new generation. Whether baking with my kids, friends, or my partner, the tradition continues to flourish.
Ingredients for Russian Tea Balls
Crafting these scrumptious cookies is simple, yet they deliver flavors steeped in nostalgia. Here’s what you’ll need:
- 1 cup unsalted butter, softened: Ensures full control over saltiness, allowing the buttery richness to shine.
- 1/2 cup powdered sugar (plus extra for coating): Adds a fine sweetness that perfectly complements the butter.
- 1 teaspoon vanilla extract: Infuses warmth and elevates the overall flavor.
- 2 1/4 cups all-purpose flour: Provides structure and substance.
- 1/4 teaspoon salt: Enhances sweetness and balances the flavors.
- 3/4 cup finely chopped nuts (walnuts, pecans, or almonds): Adds crunch and earthy richness.
- Additional powdered sugar for dusting: Creates that signature snowy look.
Step-by-Step Instructions
- Preparation Preheat your oven to 400°F (200°C). Line a baking sheet with parchment paper or a silicone mat.
- Creaming the Butter In a large bowl, cream the softened butter and 1/2 cup of powdered sugar until light and fluffy. Use an electric mixer on medium speed for best results.
- Adding Vanilla Stir in 1 teaspoon of vanilla extract. The aroma alone will set the stage for a cozy baking session.
- Incorporating Dry Ingredients In a separate bowl, whisk the all-purpose flour and salt. Gradually blend this into the butter mixture, stirring until just combined.
- Adding Nuts Fold in the finely chopped nuts, ensuring they are evenly distributed.
- Shaping the Cookies Roll small amounts of dough into 1-inch balls and place them on the baking sheet, leaving space for slight spreading.
- Baking Bake for 10-12 minutes or until the bottoms are lightly golden. The tops will remain pale.
- Cooling and Coating Allow the cookies to cool for a few minutes. While still warm, roll them in powdered sugar. Set them on a wire rack to cool completely.
- Final Dusting Once cooled, roll or sprinkle them with more powdered sugar for a beautiful, festive finish.
Tips for Success
- Flavor Variations: Add a pinch of ground cinnamon or nutmeg for a holiday twist.
- Storage: Store in an airtight container at room temperature for up to a week.
- Presentation: Serve on a festive plate with sprigs of evergreen for a stunning display.
- Photogenic Appeal: Capture the beauty of these cookies on a bright background for social media-worthy photos.
