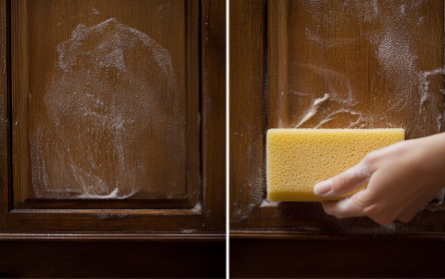
Wooden furniture in the kitchen adds warmth and character to your space, but it also faces constant exposure to grease, grime, and food splatters. Over time, grease can accumulate on wooden cabinets, tables, and chairs, leaving unsightly stains and a sticky residue that’s difficult to clean. The challenge is to remove this grease without damaging the wood or its finish. In this guide, we’ll explore effective and safe methods for removing grease from your wooden kitchen furniture, along with tips on maintaining and protecting the wood to keep it looking its best.
Understanding the Challenges of Grease on Wood
Wood is a porous material that absorbs moisture, oils, and dirt. In a kitchen setting, wooden furniture and cabinets are often exposed to cooking oils, food splashes, and steam. This exposure can cause layers of grease to build up, making surfaces look dull, sticky, and dirty. The type of finish on your wood—whether it’s varnish, lacquer, or paint—plays a significant role in how it interacts with cleaning agents. Using the wrong cleaning method can damage the finish, strip the wood of its natural oils, or cause discoloration. That’s why it’s essential to use gentle, effective cleaning techniques that target grease without harming the wood.
Step-by-Step Guide to Safely Remove Grease from Wooden Furniture
Step 1: Gather Your Cleaning Supplies
To effectively remove grease from wooden surfaces, you need the right tools and products. Here’s a list of what you’ll need:
- Mild Dish Soap: A gentle dish soap with degreasing properties is safe for wood and effective against grease.
- White Vinegar: A natural cleaner that cuts through grease without harsh chemicals.
- Baking Soda: A mild abrasive that helps lift stubborn grease without scratching the wood.
- Olive Oil or Mineral Oil: To restore shine and protect the wood after cleaning.
- Warm Water: For diluting cleaning agents and rinsing.
- Microfiber Cloths: Soft, non-abrasive cloths ideal for wiping wood without scratching.
- Soft Sponge: Use the soft side to apply cleaning solutions gently.
- Spray Bottle: For easy application of diluted solutions.
- Old Toothbrush: Helps scrub grease from crevices and detailed carvings.
Step 2: Test a Hidden Area First
Before applying any cleaning solution to the entire piece, it’s crucial to test it on a small, inconspicuous area. This test will ensure that the cleaner doesn’t harm the wood’s finish or cause discoloration. Let the solution sit for a few minutes, then wipe it off and check for any negative effects. If the finish looks intact and the wood is undamaged, proceed with the full cleaning.
Step 3: Prepare and Apply Cleaning Solutions
Option 1: Dish Soap and Warm Water Solution
This gentle method works well for lightly greased surfaces and is safe for most finishes.
- Mix the Solution: Fill a bowl or spray bottle with warm water and add a few drops of mild dish soap. Mix gently to avoid creating too many bubbles.
- Wipe Down the Surface: Dip a microfiber cloth into the soapy water, then wring it out so it’s damp but not dripping. Gently wipe down the greasy areas, working in small sections to lift the grease.
- Rinse and Dry: After cleaning, use a separate cloth dampened with plain water to wipe away any soap residue. Dry the surface immediately with a clean, dry cloth to prevent water damage.
Option 2: White Vinegar Solution
White vinegar is a natural degreaser and works wonders on stubborn grease stains without the use of harsh chemicals.
- Mix the Solution: In a spray bottle, combine equal parts white vinegar and warm water. You can add a few drops of essential oil to mask the vinegar smell if desired.
- Apply Lightly: Lightly mist the affected areas with the vinegar solution. Avoid soaking the wood, as too much moisture can damage it.
- Wipe Clean: Use a microfiber cloth to gently wipe the surface, applying a little extra pressure on stubborn spots. For thicker layers of grease, let the solution sit for a few minutes before wiping.
- Rinse and Dry: Wipe the area with a cloth dampened with plain water to remove any remaining vinegar, then dry thoroughly.
Option 3: Baking Soda Paste for Tough Grease
Baking soda is slightly abrasive, making it ideal for tackling thick or baked-on grease without scratching the wood.
- Create a Paste: Mix baking soda with a small amount of water to form a thick paste. The consistency should be spreadable but not runny.
- Apply the Paste: Using a soft cloth or sponge, apply the baking soda paste to the greasy spots. Gently rub in circular motions, focusing on the most stubborn areas.
- Rinse and Wipe: Remove the paste with a damp cloth, then rinse with a clean cloth soaked in plain water. Dry the area immediately to prevent water absorption.
Step 4: Restore the Wood’s Natural Shine
Cleaning wood, especially with degreasing agents, can strip away its natural oils, leaving it looking dull. To bring back the luster and protect the wood from future grease, follow these steps:
- Apply Olive Oil or Mineral Oil: Dampen a clean cloth with a small amount of olive oil or mineral oil.
- Buff the Wood: Gently buff the oil into the wood using circular motions. This not only restores shine but also creates a protective layer that helps repel future grease and grime.
- Wipe Off Excess: After buffing, wipe away any excess oil with a clean cloth to prevent it from becoming sticky.
Step 5: Regular Maintenance to Prevent Future Grease Build-Up
To keep your wooden kitchen furniture looking pristine, regular maintenance is essential. Here are some tips to prevent grease accumulation:
- Clean Surfaces Weekly: Wipe down your wooden furniture weekly with a damp cloth and a drop of mild dish soap to prevent grease from setting in.
- Apply Wood Polish or Conditioner: Use a wood polish or conditioner once a month to nourish the wood, protect the finish, and add a beautiful shine.
- Use Range Hoods and Ventilation: Proper ventilation in your kitchen, such as using a range hood while cooking, can significantly reduce grease build-up on furniture.
- Avoid Placing Furniture Too Close to Cooking Areas: Position wooden furniture away from direct exposure to cooking splatters when possible.
- Use Splatter Guards: Use splatter guards on pans when frying to minimize grease spread.
Common Mistakes to Avoid When Cleaning Grease from Wood
- Using Harsh Chemicals: Avoid strong degreasers, bleach, or ammonia-based cleaners, as these can strip wood finishes and cause discoloration.
- Scrubbing with Abrasive Tools: Steel wool, abrasive sponges, or hard brushes can scratch the wood surface and ruin the finish.
- Over-Wetting the Wood: Excess moisture can cause wood to warp, swell, or develop mold. Always use a damp, not wet, cloth and dry surfaces promptly.
- Skipping the Conditioning Step: After degreasing, it’s crucial to restore the wood’s natural oils to keep it healthy and protected.
Troubleshooting Tips for Stubborn Grease Stains
If grease remains after trying the above methods, consider the following additional steps:
- Repeat the Cleaning Process: Sometimes, a second application of the cleaning solution is needed for tough stains. Repeat the process, allowing the solution to sit a bit longer.
- Use a Soft Brush: For intricate areas or carvings, use an old toothbrush dipped in your cleaning solution to gently scrub away grease.
- Try Lemon Juice and Salt: For an extra natural cleaning boost, mix lemon juice with salt to form a paste. Apply it gently to stubborn grease stains, then rinse thoroughly.
Conclusion
Grease build-up on wooden kitchen furniture can be a tough problem, but with the right techniques and regular maintenance, you can keep your wood looking beautiful and clean. By using gentle, natural cleaners and taking steps to protect the wood’s finish, you’ll ensure that your kitchen remains a warm, inviting space with furniture that stands the test of time. Regular cleaning, combined with protective conditioning, will help your wooden surfaces resist future grease and grime, making your kitchen a cleaner, healthier environment.


