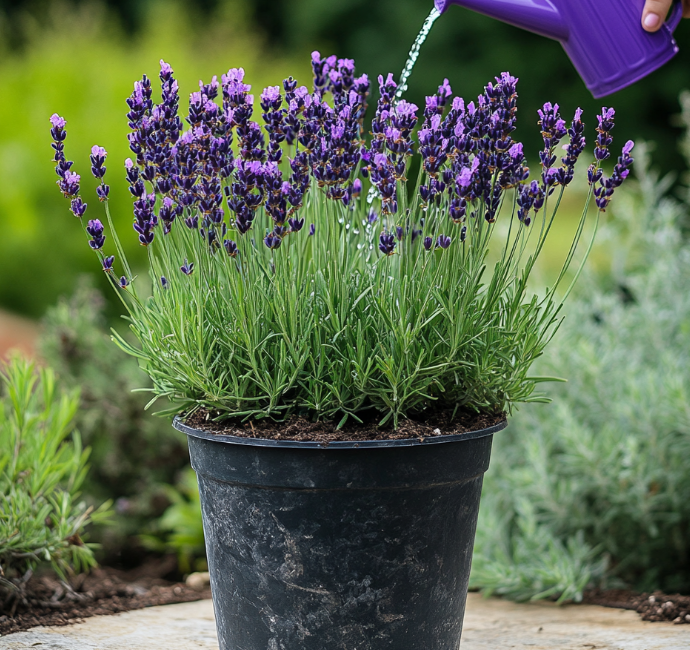
If you’re a gardening enthusiast looking to expand your lavender collection, propagating from cuttings is the perfect method! Not only does this allow you to save money, but it also ensures your new plants are genetically identical to their parent. Lavender propagation might sound intimidating, but with the right tools and techniques, it’s a simple and rewarding process.
In this detailed guide, we’ll walk you through how to propagate lavender successfully with step-by-step instructions. Let’s get started on building a fragrant lavender haven in your garden! 🌱
Why Propagate Lavender from Cuttings? 🤔
Before diving into the process, it’s important to understand why propagation is beneficial. Lavender is a beautiful and versatile herb, known for its aromatic flowers and various uses in culinary, medicinal, and aesthetic applications. Propagating lavender allows you to:
- Save Money 💰: Buying new plants can be costly, especially if you want a large lavender garden.
- Grow Consistent Plants 🌱: Propagation ensures that your new plants retain the same color, growth habit, and fragrance as the parent.
- Expand Your Garden Quickly 🌸: Lavender cuttings root relatively fast, meaning you can increase your lavender collection within weeks.
The Perfect Time for Taking Lavender Cuttings 🕒
Timing is crucial for successful lavender propagation. Here’s when to take cuttings for optimal growth:
- Late Spring to Early Summer 🌼: This is the best time when the lavender plant is actively growing. Softwood cuttings root more easily during this period.
- Late Summer to Early Fall 🍁: You can also take semi-hardwood cuttings at this time, although the rooting process might take a bit longer.
In both cases, ensure you’re choosing strong and healthy stems that haven’t flowered yet. Non-flowering sprigs focus on root development rather than using energy to bloom.
Step-by-Step Guide to Lavender Propagation 🌿🛠️
1. Select the Best Parent Plant 🌱
Choose a disease-free and vigorous lavender plant for taking cuttings. A robust parent plant increases your chances of success. Look for stems that are 4-6 inches long, with no signs of stress or damage.
2. Prepare Your Tools 🛠️
Gather the following items to ensure a smooth propagation process:
- Sharp and clean pruners or scissors ✂️
- Rooting hormone (optional but recommended) 🌱
- Small pots filled with well-draining soil (potting mix with sand or perlite) 🏺
- A plastic bag or propagator 🌡️
- Labels for tracking different varieties 🏷️
Sterilize your tools with rubbing alcohol to prevent contamination and disease.
3. Take the Lavender Cuttings ✂️
Once you’ve found the perfect sprig, use clean pruners to make a cut just below a leaf node. This is where roots are most likely to develop. Take several cuttings to increase your chances of success.
4. Prepare the Cuttings for Rooting 🌱
Remove the lower leaves from each cutting, leaving only a couple of pairs at the top. This helps the cutting focus its energy on producing roots instead of maintaining foliage. Optionally, dip the base of each cutting in rooting hormone to boost your success rate.
5. Plant the Cuttings 🏺
Fill small pots or trays with a well-draining potting mix. Make small holes in the soil using a pencil or dibber and insert the lavender cuttings. Ensure that the bare stem (where the leaves were removed) is buried in the soil.
6. Create a Humid Environment 🌡️
Cover the pots with a plastic bag or place them in a propagator to maintain humidity, which is crucial for root formation. Keep the cuttings in a bright spot, but out of direct sunlight. Ensure the soil remains moist but not waterlogged.
Caring for Lavender Cuttings: The Waiting Game 🕰️
Lavender cuttings typically take 3-6 weeks to develop roots. During this period, check the soil regularly to keep it moist. Ventilate the cuttings occasionally to prevent mold or mildew from forming.
You’ll know your cuttings have rooted when you see new growth. At this point, you can start thinking about transplanting your lavender into its final home!
Next Steps: Transplanting and Common Mistakes 🚨
You’re almost there! Let’s explore the final stage—transplanting your lavender cuttings into their permanent spots in the garden. Plus, we’ll cover common mistakes you should avoid during the propagation process to ensure success. Don’t miss out on these essential tips for thriving lavender plants! 🌱🌸
How to Transplant Rooted Lavender Cuttings and Avoid Mistakes 🌿🚫
Once your lavender cuttings have developed healthy roots, it’s time to transplant them. Follow these steps to ensure a smooth transition from pot to garden:
1. Acclimate Your Lavender to Outdoor Conditions ☀️
Before transplanting, harden off your lavender cuttings by gradually introducing them to outdoor conditions. Place them in a sheltered spot outside for a few hours each day, gradually increasing their time outdoors.
2. Choose a Well-Drained Spot in Your Garden 🌿
Lavender thrives in well-drained soil with plenty of sunlight. Ensure the area is free from heavy clay soils, which can lead to root rot. You can also plant your lavender in large pots if garden space is limited.
3. Transplanting Tips 🏡
- Space your lavender cuttings 12-18 inches apart to give them room to grow.
- Water the plants thoroughly after transplanting, but avoid overwatering.
- Add a layer of mulch around the base to retain moisture and deter weeds.
Common Mistakes to Avoid When Propagating Lavender 🚨
While propagating lavender is straightforward, there are some common pitfalls to watch out for:
- Taking cuttings from a stressed plant: Always choose a healthy parent plant to ensure strong offspring.
- Overwatering: Too much water can lead to root rot. Lavender thrives in dry conditions, so ensure the soil is well-drained.
- Lack of humidity: Lavender cuttings need a humid environment to root. Using a plastic bag or propagator is crucial during the early stages.
Final Thoughts: Your Lavender Journey Begins Here 🌸🌿
By following these steps, you’ll be well on your way to propagating lavender like a pro! With just a little patience and the right care, you’ll have a garden full of fragrant lavender plants to enjoy for years to come. Whether you’re using them for aromatherapy, decoration, or culinary purposes, your lavender propagation project will add beauty and fragrance to your garden.
Ready to take your lavender garden to the next level? Start your propagation journey today and enjoy the rewards of growing your own lavender plants! Happy gardening! 🌸🌱